 ENGLISH
 DEUTSCH
 ESPAÑOL
 FRANÇAIS
The Seat-Stop exercise is the first of a series dedicated to help riders get control of their horses on one hand, and to help horses feel good about their riders on the other hand. Seat-Stop consists of teaching a horse to stop as soon as it feels our shifting of position on the saddle. We will use the one-rein stop to do so.
Positions
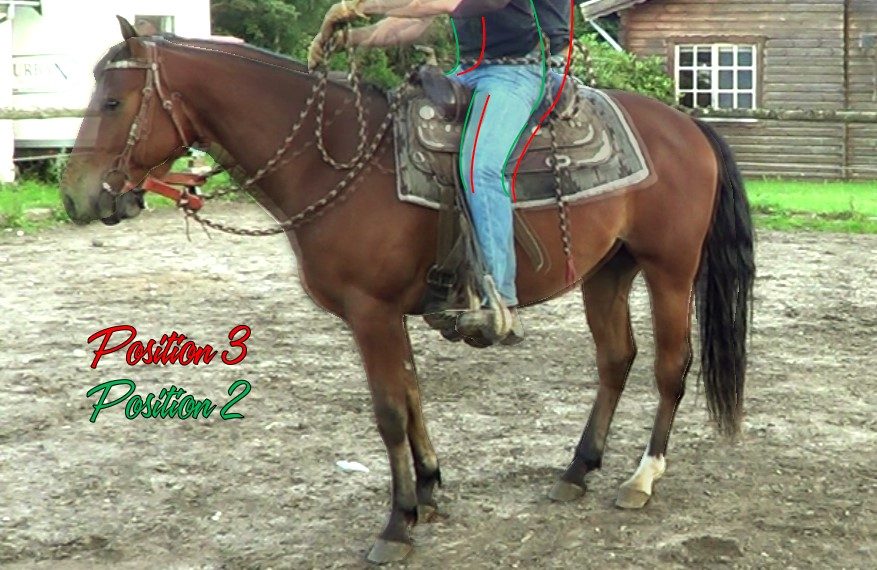
My first idea was to post detailed illustrations of the following positions but I think it will be more helpful to let you find naturally these positions on the saddle, the picture is here to give you a rough idea _ yet it has to become a feel.
- Position 3 is deep on your pockets. This is used to stop the horse, to remain still.
- Position 2 is upright in the saddle, above your seatbones. This is the riding position and used as a cue to walk the horse.
- Position 1 is slightly forward. This is used to gallop or to jump for instance.
Process
The first step is to walk your horse, so get the habit at once to switch from position 3 to position 2. That will not mean anything to your horse at the beginning, but consistency will help to teach a light response to your horse. I will tell you more about cues to walk, trot and canter later in the program.
We will teach the seat-stop by using the one-rein stop, which is your hand break when riding your horse.
- Lateral flexion:
You may remember I mentioned this in my article How to mount a horse? This lateral flexion is useful to make sure your horse stands still when mounting, but it also helps your horse to find lightness and softness, which will be a key to the Soft-Feel later on. So, first work that lateral flexion from a stop, your horse should stand still and give its head on a soft and light feel. - One-rein stop:
Put your horse on a live walk, then bend the head laterally until your horse stops and gives its head. As for the lateral flexion, keep in mind that you should work this exercise on both sides. Most of the times, you will notice that horses have a good side and a bad side. Make sure you repeat the process a little more on that bad side to help your horse get out of trouble and feel comfortable all the time. - Seat-stop:
Now that your horse and you are good at the one-rein stop, you can add this seat-position factor. Walk your horse over a few meters, then switch from position 2 to position 3 and let a few seconds to your horse to feel the difference. Next, stop your horse with one-rein. Pretty soon, your horse will feel you, it will understand that your changing position means something: stop!
There are three parameters to recognize a good lateral bending, presented in chronological order.
1) the poll is slightly higher than the withers;
2) ears are leveled horizontally;
3) head is flexed at 90° vertically.
I broke the process in several steps for the sake of the horsemen who need much more time than the horses to understand and learn. Yet, when you get better and more experienced to these projects (lateral flexion, one-rein stop and seat-stop), you can blend them all during your very first session of work.
Q&A
What if my horse does not give its head when I ask for a lateral flexion?
There is only one reason for a horse not to give its head: the rider does not give it a chance to do so! A lot of people will demand a quick response from their horse, but most of the time that is not how it works. Horses do not know in advance what you ask for, so let them some time to process your cue, to think and find the response by themselves. Make sure you pull the head correctly, at 90°, and wait… wait a little more if necessary, but let your horse try. As soon as your horse gives its head, maybe just a couple of millimeters the first time, release COMPLETELY your reins and give your horse peace for a minute. Releasing the reins means you should act as if the reins are red hot and burn your hands, let them go.
What if my horse does not stop with one rein?
Different question, same answer: leave some time to your horse to process your request. As Ray Hunt used to say:
Ray Hunt, Colt Starting Series
What if my horse does not stop when I switch to position 3?
First, just make sure your signals are crystal clear: lateral flexion should be good, one-rein stop should be well understood by your equine partner. Now, some horses can be quite spoiled, in that case _ in that case only! _ you should use the two-rein stop to teach the seat-stop. Walk your horse a few steps, then switch to position 3 and give a few seconds to your horse before you raise both hands in mid-air. That means you should contact the mouth, without pulling, wait a few seconds to let a chance to your horse to stop.
With the more spoiled horses (riding school horses used to lead the riders, some dressage horses used to have their mouth butchered by tight bits and reins, etc.) you may have to pull real firm… In such a case, please make sure you release completely the reins as soon as the horse stops, the difference should be clear and it should find peace as soon as it stops.